Small Fixer Upper | Simple Bathroom Demo on a Historic Home
This small fixer upper simple bathroom demo on our historic home will hopefully inspire your own DIY projects!
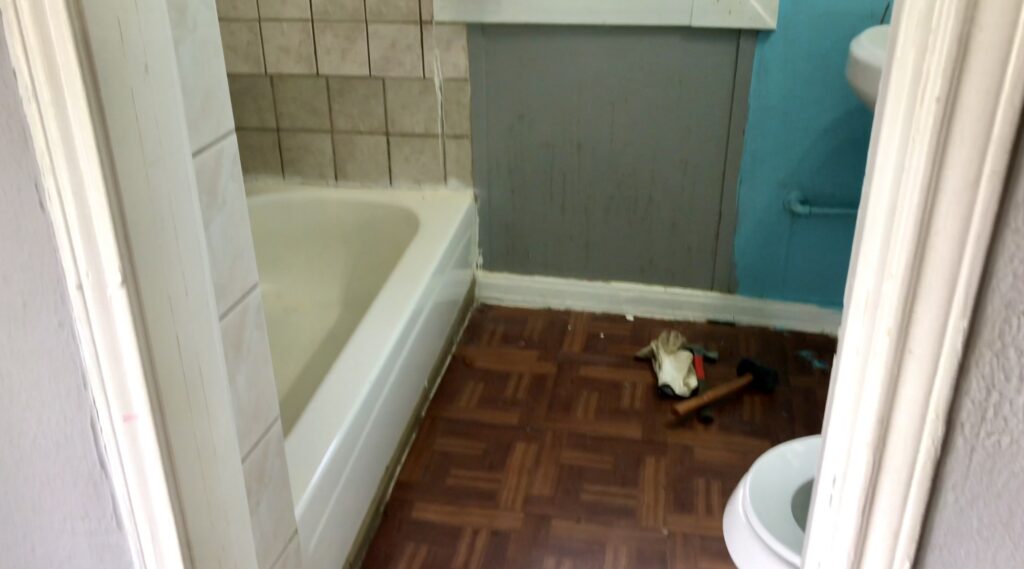
tiny fixer upper bathroom located in bedroom
We had what felt like the TINIEST bathroom in this small fixer upper! Before the actual demo began, you could hear Nate saying, “Beautiful, beautiful little bathroom, but it’s got to go!” He seems to be really fond of demolition. Maybe it’s a guy thing. Or maybe there is just satisfaction in busting things up!
For me, the problem with the bathroom was that you had to get into the bedroom to use the ONE bathroom in this TINY two bedroom one bath house, and I’m like no, that’s kinda inconvenient.

Isaiah 32:18
My people will dwell in a peaceful habitation, in secure dwellings, and in quiet resting places.
You can also watch a video about this here.
As I reflect on the bathroom demo on our historic home in our living room while filming our YouTube video, I recall the joys of living in the midst of real time renovations occurring daily in our house. If you couldn’t tell, there was actually sarcasm in that statement! But, I’m sure you picked up on that especially if you are tackling your own home DIY projects!
There is never a dull day or moment around here. The latest was that I lost my beautiful old shiplap wall behind me as a backdrop to my filming and now we were back to the drab ole drywall for now since Nate moved it to work on another project in the kitchen. There is constant movement going on around here.
Here we are at day 10 of home renovations and it’s time for some bathroom demo now!
Before we get to the bathroom demo on a historic home, take a look at how small our bathroom was! Later we’ll show you what we did about it. At first, I didn’t think it was possible to make it larger. It was around maybe 6’x6’ total, which makes for a very small full bathroom.
Bathroom demo on a historic home
Alright here we go.. time to demo the bathroom now! Nate had the sledge hammer in hand and safety glasses on. It’s show time! Let’s see what’s behind here (the shower wall). He starts by hammering the shower/bathtub tile on the walls and breaks all that apart. He keeps the pipes intact and works carefully around them. Now you can see a wooden like frame appearing as the tile and drywall begin to disappear.

All the debris falls into the bathtub for now like a holding area for all the crap that would need to be thrown out.
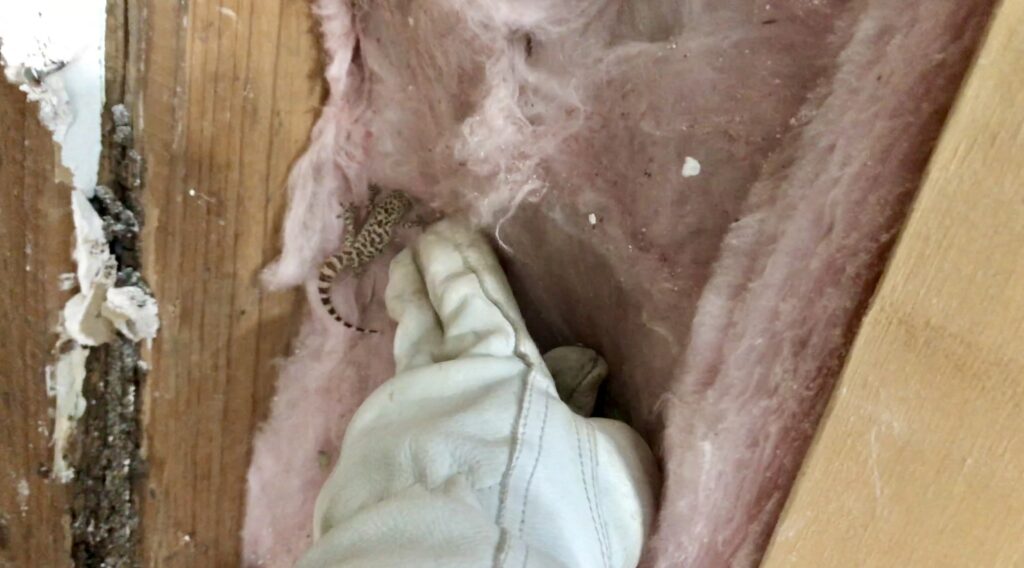
There is also insulation on the longest side of the wall that goes to the outside. And behind that insulation, there was old and nasty vapor barrier barley holding on and ripped in several places. Looks like it’s been there for a while. There were three walls total in the shower area to demo.

On the last wall, tucked into the pink insulation, like a baby animal wrapped in a blanket, was a cute little what appeared to be a leopard gecko! As if talking to a baby, Nate says to it, “Did I wake you?” It quickly squirms around as he figures out a way to get it out of the bathroom and back into nature where it belongs. The little guy falls to the ground and you can hear Nate say, “Wow, I just want to save your life, that’s all! I’m going to take it outside.”
Man, demolition is fun! Nate was having a blast breaking up our precious and beautiful little bathroom. “I just started going through here with a sledge hammer,” he says. “Knocking crap off. It already looks better. Not really, but it was pretty bad before.”

The pipes were still intact and water was not squirting everywhere. Now he has to go through all the debris that has collected in the bathtub and put them in plastic bags. He already has a pile in the living room and will just add to it.

Bathtub removal
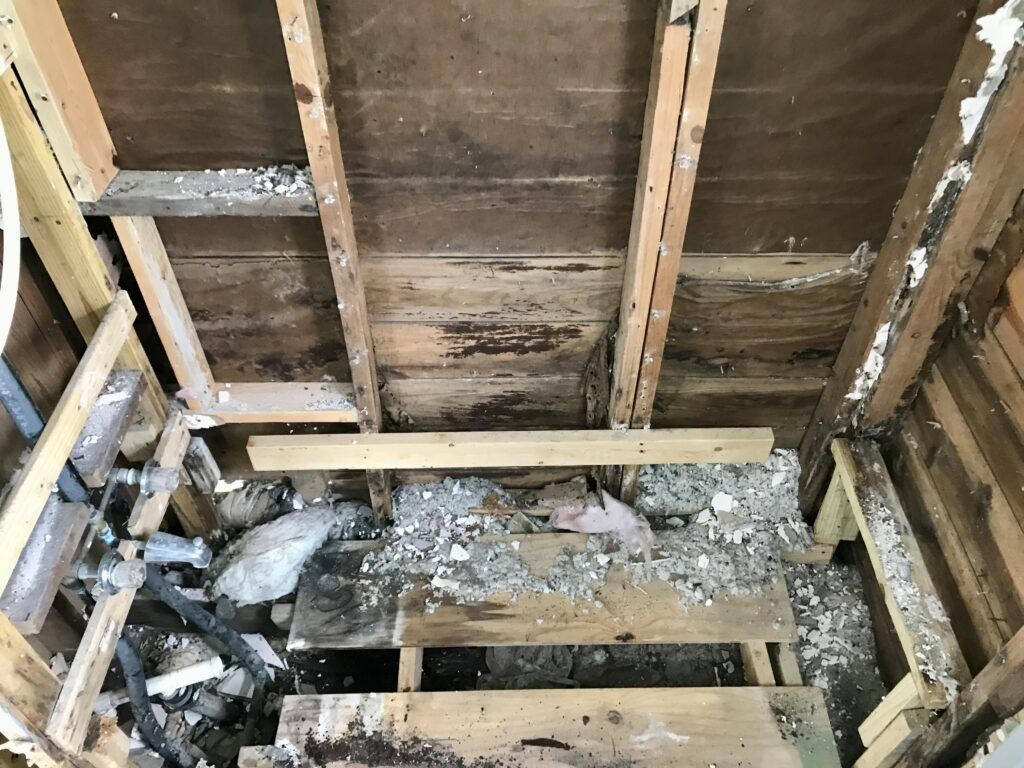
Now on to remove the actual bathtub. That big ole metal thing, gross and nasty. The wood frame in the shower and bathtub area are now exposed and where the bathtub use to sit was an interesting wooden plank that Nate was not sure about and thought it was an interesting way to build. Perhaps it was someone else’s DIY project in the past to somehow fit a tub in this very small bathroom. Who knows as the house has been a rental for over 60 years!

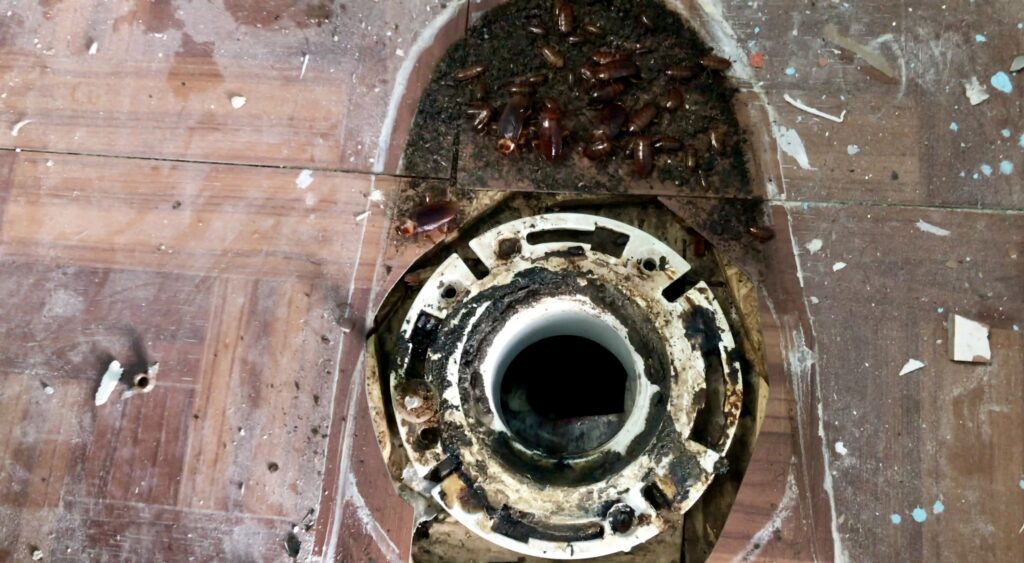
Toilet removal and surprise!
Next up was to remove the toilet. But, this came with a bit of a surprise that Nate was not at all anticipating! He was about to take the toilet out and never done that before and had a feeling water would go everywhere so he turned it off, but there was still some water inside the toilet bowl. He starts to remove the entire toilet and when he lifts it up completely, what you hear is a loud gasp.

“You pulled up the toilet, what did you find?,” I asked. “A family of roaches!,” was his reply. “My heart was pounding, it was disgusting!” He took a video of this and you can see the camera panning toward the area the toilet bowl once rested on. There on display was the large family of cockroaches living underneath it! This is just sick! Nate exclaimed. “Oh so gross!”

“When you pulled up the toilet, what happened?,” I had him recall. “I just looked down there and there was an entire family of roaches.” He said matter of factly. “They were all sizes, about 20 of them, all on top of each other, just hanging out in there.”
Thanks for joining us on this journey! We hope that you will find inspiration watching us learn as we go while we’re attempting to renovate and rebuild this old small historic home mostly on our own.


This post is instructive and hilarious!
Haha.. thank you! 🥰
Great post!
Thanks! 😍
Great post! Never a dull moment when Renovating. Atleast you are having fun!
You are definitely right! We are totally having a blast.. most of the time! 😍
Wow! Can’t wait to keep on following along
Thanks! Glad to have you here! 🥰